Ten Tips for Arranging Artwork: A Stylish Guide
Artwork is the secret sauce of interior design. It adds personality, depth, and that perfect finishing touch to your space. But arranging it? That’s where things can get tricky. Whether you’re hanging a single statement piece or curating a gallery wall, these ten simple tips will help you arrange your artwork like a pro.
1. Choose the Perfect Wall
Not every wall is begging for artwork, but some are practically crying out for it. Large walls are ideal for a statement piece or a collection of smaller pieces arranged thoughtfully. Smaller walls? They’re perfect for petite artwork, quirky shapes, or even one standout print.
Tip: Spaces between windows, doors, or awkward nooks are brilliant for smaller pieces—they fill the gap beautifully without overwhelming the room.
2. Plan Before You Hang
Don’t just grab a hammer and hope for the best—trust me, your walls will thank you.
- Lay your artwork out on the floor first to experiment with arrangements.
- Or go old-school: cut kraft paper templates of your pieces, tape them to the wall, and shuffle them around until you’re happy.
Why it’s worth it: A little prep saves time, patching up holes, and that sinking feeling of “hmm, this isn’t quite right.”
3. Hang Artwork at Eye Level
If it’s too high or too low, it’ll throw off the whole room.
The magic number? 57-60 inches from the floor to the centre of the artwork. This is standard “eye level” for most people. That said, feel free to adjust depending on the room:
- In living rooms or spaces with low ceilings, go a touch lower for a cozier feel.
- For a gallery wall, keep the central pieces around eye level and build out from there.
4. Work With Your Furniture
Your furniture and artwork should be best mates, not battling for attention. When hanging artwork above furniture, keep these guidelines in mind:
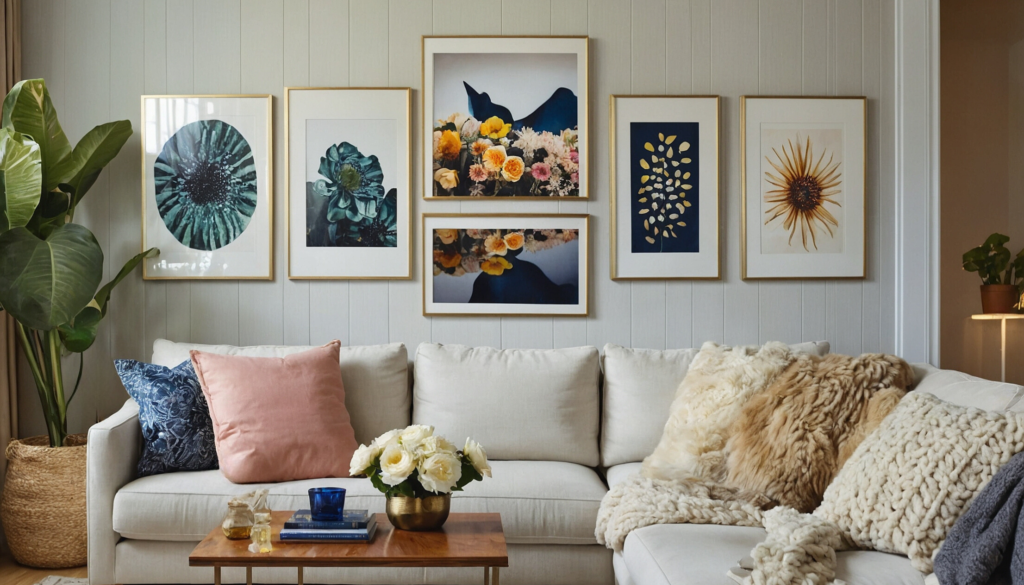
- Your art should be narrower than the furniture below it. A good rule of thumb is about two-thirds the width.
- Leave 8-10 inches of space between the top of the furniture and the bottom of the artwork.
Bonus tip: Check that the artwork isn’t too close to anything that could damage it, like vases, table lamps, or overly enthusiastic kids.
5. Create Visual Balance
Think of your arrangement like balancing scales—it needs to feel even, not lopsided.
- Start with the largest piece first, ideally centred or near the bottom of your arrangement.
- Build around it with smaller pieces, making sure the visual weight is spread evenly across the wall.
Quick trick: Imagine an invisible line running through the centre of the arrangement. If one side feels heavier, swap things around until it feels right.
6. Pick Art You Love
This one’s simple: choose pieces that make you happy!
- Love bold, modern art? Pair it with sleek furniture for a contemporary vibe.
- Prefer softer, vintage styles? Combine them with antique or boho-inspired decor.
- Don’t forget to consider the colour palette of your room to make everything feel cohesive.
Rule of thumb: If it speaks to you and works with your space, it’s the right choice.
7. Pair With Purpose
When grouping pieces together, look for a common thread.
- Stick to similar themes, like botanical prints, monochrome photos, or abstract designs.
- Feeling bold? Mix styles! Juxtapose modern art with antique pieces for a curated, eclectic look.
Pro tip: Even contrasting pieces can work if they share a similar colour scheme or feel.
8. Space It Like a Pro
Spacing is the difference between “Wow!” and “Hmm, something’s off.” Here’s your cheat sheet:
- Grid layouts: Leave 3-4 inches between each frame for a polished, uniform look.
- Triptych (three-piece) layouts: Space pieces 4-6 inches apart for balance.
Whatever arrangement you choose, keep the spacing consistent for a clean and cohesive effect.
9. Add a Gallery Wall Twist
A gallery wall is like the ultimate design flex. To make it your own:
- Include personal touches: Mix framed photos, keepsakes, or even textiles and ceramics.
- Experiment with frames: Stick to 1-3 frame styles for cohesion, or go for an eclectic look—but keep it intentional.
- Level the centres of the pictures, not the tops, for a professional finish.
Why it works: Gallery walls are personal, dynamic, and endlessly customisable. The best part? No two are ever the same.
10. Use the Right Tools
The last thing you want is your artwork crashing down in the middle of the night.
- For drywall with a stud: Use a stud finder and picture hangers.
- No stud? Opt for anchors and screws to ensure stability.
- Masonry or concrete walls? Grab a hammer drill and masonry screws for the win.
Final tip: Take your time to measure and double-check everything—it’s worth the effort for perfectly hung art.
Bonus Tips for Arranging Artwork
- Avoid hanging artwork too high—especially above a sofa. Keep it visually connected to the furniture.
- Mix framed and unframed pieces for a more interesting gallery wall.
- If you’re stuck, try arranging your artwork on the floor before hanging it. This makes it easier to tweak the layout.
- Most importantly, have fun! Your walls are a canvas for your creativity, so make them meaningful and uniquely yours.
The Final Frame (Pun Fully Intended)
Arranging artwork might seem daunting, but with these tips, you’ll have a wall that feels polished, stylish, and totally “you.” So grab your favourite pieces, a hammer, and a little imagination—it’s time to let your walls do the talking!
 Skip to content


